Product Requirements:
Device:
Windows 95/98/NT or Macintosh
Free RS-232, RS-422 9pin Serial connector PC/MAC
I love photography but don’t consider myself an expert on the subject by any
means. I do know that I enjoy taking pictures and viewing them later. But, gone are
the days of sitting on the living room couch thumbing thru a regular paper photo
album. Now we have digital cameras and can view the images directly on our
computer monitor. That’s all well and good, but it might not be the most
enjoyable method for view pictures as not everyone has a computer or wants to
sit in front of one just to relive old memories.
That’s where a digital photo frame comes in. The digital frame looks like
your typical picture frame that probably almost everyone has somewhere in their home.
BUT, this frame doesn’t just display one picture, instead it can cycle thru 100’s or
even a 1000 images!
I recently took a look at a low end
digital frame from Kensington
which was my first foray into this type of device. It was fun to use, but was
very limited as it could only display 12 pictures and required a connection to a PC to transfer pictures. The DF-560
Digi-Frame that I’ll be talking about today is a high end frame that makes
the Kensington look like a toy. But, is this frame worth the huge price tag?
Let’s find out….
Specs:
LCD: 5.6" diagonal, 230,400 dot (640 x 480), Active-Matrix color TFT LCD
Size (with frame attached): 9.0 x 6.7 x 1.7 in (170 x 228 x 44 mm)
Weight: 2 lb.
Image format: .JPG
Maximum number of images: 1,500
Storage format: Compact Flash or SmartMedia
Power: 100-240 VAC, 60Hz
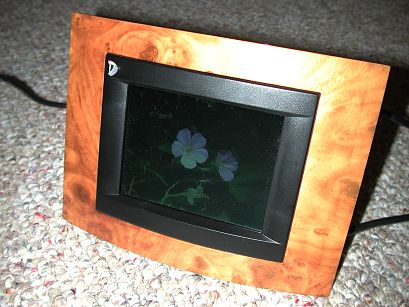
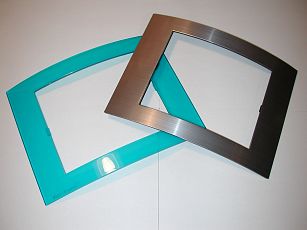
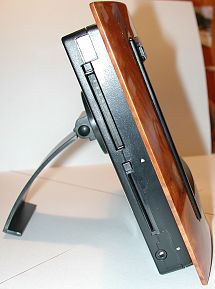
First of all, the DF-560 looks great even before you turn it on. It comes complete with three interchangeable
snap-on decorator frames to
match your decor or your mood. The frames are made of a thick plastic and
include a wood burl look, metal look, and an aqua color. I really like the
wood look, so that is the one that I chose to use during the review period.
Other
frame packs are available as an optional purchase.
The rest of the device is housed in a black plastic case that is heavy enough
to stay put on any table that you place it on. An adjustable stand allows you to
position the frame in either a landscape or portrait orientation. A very cool feature of
the DF-560 rotates the pictures automatically when you physically change the frame from
landscape to portrait or visa versa. No setting adjustments are required for the
change to occur. It
just flips the screen as soon as you set the frame down in your desired orientation.
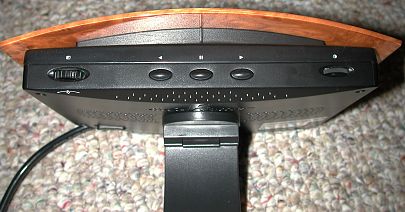
At the top of the device are the main controls. From left to right there is
the menu wheel, previous picture, pause picture, next picture, and the contrast
adjustment wheel.
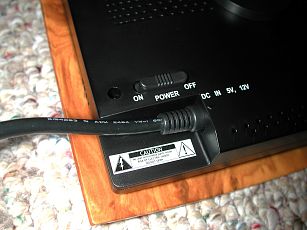
On the lower back portion of the frame is a sliding power switch and power
supply jack. One minor gripe that I have about the Digi-Frame is the fact that
the power brick and supplied cable are heavy and bulky. I guess it’s not a big
deal since you won’t be moving the frame from location to location, but I did
want to mention it.
On the right side of the frame are the memory card slots. A really great
thing about the DF-560 is the fact that you don’t even NEED to connect it to a
PC or a Mac if you don’t want to or don’t have one. All you have to do is snap some pix with your
digital camera, pull out the CF or SmartMedia card with the .jpg images on it
and pop the card into the associated slot on the frame and viola, you’re all set! The
frame will automatically find all the images and start displaying them within a
few seconds.
Another way to get images into the frame is with the
included PC / MAC serial cable. With it, you can transfer images from email and
the internet to the device. Unfortunately though, this is a serial cable which
seems pretty stone age. If you want to use USB, you have to purchase a serial to
USB converter. In my opinion, due to the cost of this frame, serial, USB and
even firewire cables should have all been included.
Once you have a memory card full of images, you just plug it into the
Digi-Frame and turn it on. After a brief pause, the frame will beep and a
welcome screen will be displayed. That screen will quickly disappear and the
images on your memory card will begin displaying.
With the easy-to-use graphic on-screen menu system, you can choose
which of your stored images to display in up to ten different slide shows, each
with its own pictures and settings. Choose from nine different transition
effects, set the time between picture changes, add special effects, select
random or user-defined order, and more.

The different transition effects are:
Wipe
The screen is filled with black, then the new images "wipes" down from the top
of the screen.
Scattered Slides
Images are reduced in size and displayed at random positions on the screen.
Light Box
Images are reduced in size and displayed in the Scattered Slides mode, but one
on top of the other.
Black Stripes
The old image is overwritten with stripes, then the new images wipes from the
top.
Bouncing Thumbnails
A random selection of thumbnails from stored images is shown bouncing
around the screen for a few seconds between images.
Fade Out
The current image quickly darkens to black, the next image in the show then
wipes down to replace it.
Dissolve
The current picture dissolves into the next picture in the show.
Mosaic
Large chunks disappear, revealing the next picture in the show.
Secret Panels
Panels slide to reveal the next picture in the show.
Random (default)
One of the effects above is randomly selected between each picture.
Personally, some of the transition effects are kind of annoying. I don’t like
the scattered slides or bouncing thumbnail type methods because you really can’t make
out what the thumbnails are anyway because they are too small and pixilated. I think the simple wipe or fade out
transition effects work the best.
There are quite a few other settings that you can adjust in the onscreen
menu. These include:
Auto Color Fill
Fills the unused portion of the screen wit a background color taken from the
displayed image.
Time Between Slides
You can select the amount of time between image changes from 1 second to 10
minutes.
Slide Order
You can chose to display images in your slideshow either in the order you
selected in the slideshow setup screen, or in a random order.
Display Quality
Select between Fastest, Medium, and Best.
Special Effect
Choose from None, Black and White, Sepia Tone, Starlight, Infra-red, and Random.
If you are the type of person that is really organized and likes to view
their images by topics or themes, you can create up to 10 different slide shows
per memory card all with their own saved settings. By using the on screen menu,
you can choose the individual pictures to add or remove for each slideshow.
Now on to the most important aspect of this device: picture quality. Unlike
the Kensington frame that I reviewed, this frame has a pretty good viewing
angle. It doesn’t require you to be directly in front of the display to view the
images. Although being directly in front of the screen will give you the best
picture, viewing slightly from the side works as well. The screen is very crisp,
bright and has good color definition. The contrast wheel works really well for
making adjustments to the screen brightness.
As always, nothing is perfect though. There are a few ‘gotchas’ with the Digi-Frame as far as its display
abilities. Due to the fact that this frame has a max resolution of 640 x 480, it
will rescale larger images down in order to display them. This causes images to
sometimes appear blocky or pixilated. Although having the ability to just pop a
memory card into the frame directly from your camera, viewing images this way
may cause them to look less than stellar on the frame’s display. You do have two
ways around this problem though. You
can set your camera’s resolution down to a lower level, or you can resize and
resave the pictures before viewing them on the frame.
To give you an idea of what a I’m talking about, below you can see two images. The one on the left came directly out of my
digital camera (2048 x 1536) without any modification. The picture on the right is the same
image that I resized down to 640 x 480 and then resaved to the CF card. I
apologize for the image quality. It is VERY hard to take a picture of a
screen… Don’t pay attention to the colors in the images below as I probably
snapped the pics at slightly different angles. Pay more attention to the edges.
I think you’ll agree than the image on the left has a bad case of the jaggies.


This is really the weakest part of this digital frame. I think it could be so much better if it were able to do a better job at
resizing. It needs a way to smooth the jaggies away.
As a side note, the manual that comes with frame points out the fact that the
display’s backlight has a minimum life expectancy of at least 10,000 hours which is
equivalent to about 14 months of continuous 24hr use. If you only have the frame
powered on for 5hrs a day, it should last for 5yrs. That is one setting that
this frame doesn’t have that would be very useful… a way to have it power up
and down automatically during certain hours of the day.
On a positive note, I found the Digi-Frame to be quite fast at switching between pictures. Even
mega pixel images that were more than 1mb in size displayed quickly on the screen.
I like this frame very much, but wow it sure is expensive! I understand that
the average person is not going to have that kind of cash to lay out on such a
device. I know I wouldn’t be able to purchase one if I was in the market for a
digital frame… If the price were half as much, it had a larger screen, included a USB cable instead
of serial, and it had the feature of allow other people to send images to it
like the Ceiva frame (review to be posted tomorrow), I would be more apt to recommend it. As it is, I would say that
this is a nice frame for someone with lots of disposable income and doesn’t
necessarily have a PC or Mac..
Available from eframecentral.com
and other retailers.
Price: $549
Pros:
Doesn’t require a PC to use
Works with CF and / or SmartMedia cards
Can display up to 1,500 images
Cons:
Very expensive
Uses a serial cable to connect to PC / Mac instead of USB
Doesn’t have a setting to automatically power the unit on and off at specified
times
Scaled down images can appear blocky

Gerber Gear Suspension 12-in-1 EDC Multi-Plier Multitool with Pocket Knife, Needle Nose Pliers, Wire Cutters and More, Gifts for Men, Camping and Survival, Grey
(as of June 19, 2026 18:47 GMT -05:00 - More infoProduct prices and availability are accurate as of the date/time indicated and are subject to change. Any price and availability information displayed on [relevant Amazon Site(s), as applicable] at the time of purchase will apply to the purchase of this product.)
Gerber Gear Diesel Multitool Needle Nose Pliers Set, 12-in-1 EDC Multi-Tool Knife, Survival Gear and Equipment, Black
(as of June 19, 2026 18:47 GMT -05:00 - More infoProduct prices and availability are accurate as of the date/time indicated and are subject to change. Any price and availability information displayed on [relevant Amazon Site(s), as applicable] at the time of purchase will apply to the purchase of this product.)Product Information
| Price: | 549.0 |
| Manufacturer: | Digi-Frame |
| Pros: |
|
| Cons: |
|